How to take a screenshot in Teamviewer
You want to record images during the process of controlling Teamviewer software, the hottest remote control software today. This tip introduces you how to take Teamviewer photos without having to use other support software.
Normally, if you want to take a screenshot of your computer screen, you need to use supporting software. You can also take a screenshot of the computer screen by default software. However, in Teamviewer, if you apply this method, it is quite cumbersome and time consuming. To take screenshots in Teamviewer faster, you should use the built-in Teamview screenshot method.
HOW TO TAKE A SCREEN PICTURE IN TEAMVIEWER
Step 1: On the Teamviewer interface, select Files & Extras.
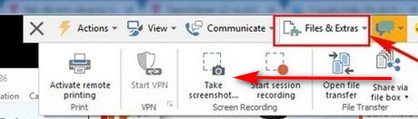
Step 2: Continue to select Take Screenshot.
Step 3: Select Save as to save the newly captured file to your computer. Name the file, choose an image format and click Save to save the file.
The screenshot trick is a pretty useful feature on Teamviewer. In addition, users who are afraid to take pictures can return to the entire control process in Teamview. How to record videos in Teamviewer has two different tricks. You can record videos in Teamviewer manually or automatically to record the process of controlling the computer.